The Combative Drawstroke

CHL discussions that do not fit into more specific topics

Moderators: carlson1, Charles L. Cotton

Post Reply

Topic author
Paul Gomez
Junior Member
Posts in topic: 1
Posts: 9
Joined: Wed Nov 30, 2011 2:18 pm

The Combative Drawstroke

#1

Post by Paul Gomez »

I've been a proponent of the 4 count drawstroke since I first became aware of it sometime around 1996. Prior to that, I utilized the textbook Modern Technique drawstroke which was promulgated by Jeff Cooper, Chuck Taylor and legion of acolytes. In the classic Modern Technique drawstroke, as soon as the pistol clears the holster, it is thrust forward and the support hand mates with the gun hand [at Guard or Low Ready] as the package travels out and up. The gun travels in an arc from the holster to extension. Originally, it was taught as Grip...Clear...Click...Smack...Up... [followed by Look...Press].

In contrast, the 4 count draw has the gun clearing the holster and continuing upward until the gun hand hits its natural limit of travel and the muzzle is cammed forward at Count 2. The hands join high on the chest and the gun is driven straight out to target. Variations on the 4 count draw can be seen on the ShivWorks Fighting Handgun DVD, Kelly McCann's videos, Ron Avery's video series and from more and more trainers. To the best of my knowledge, Louis Awerbuck was the first trainer to introduce the 90-degree/4-Count drawstroke to the training community, but I'm sure their was much parallel development going on.

We need a robust drawstroke that takes into account the widest range of foreseeable problems and allows for a singular response. Under duress is not the time to have to sort out which drawstroke, or how to modify a drawstroke, or what gun position you should employ.

What follows is a very detailed breakdown illustrating the 4-Count, or 90-degree, Drawstroke as I teach it. Additionally, I'll illustrate some commonly taught variations of some of the counts and explain the thought processes behind them.

Some Basic Points

Drawstroke is the definitive motor skill related to fighting with a handgun.

Drawstroke is a 4-Count maneuver consisting of a, primarily, vertical line followed by a, primarily, horizontal line.

At each count, the weapon is higher and further forward than at the previous count.

The further from your torso the gun is, the greater the weapon retention issues.

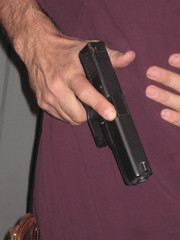
The photos for this sequence will begin with establishing the Full Firing Grip on the holstered handgun.

Pic One illustrates the initial interface with the pistol. The thumb is flagged. The fingers, including the trigger finger, are extended and the web of the hand [between the thumb and forefinger] is driven deep into the tang of the pistol.

By keeping the thumb rigidly extended, we maximize contact between the gun hand thumb and the body, thereby increasing tactile awareness of gun position, we allow the highest practical position of the web of the hand relative to the butt of the gun and we do not have to reposition the gun hand thumb when it comes time to establish our two hand grip.

Image

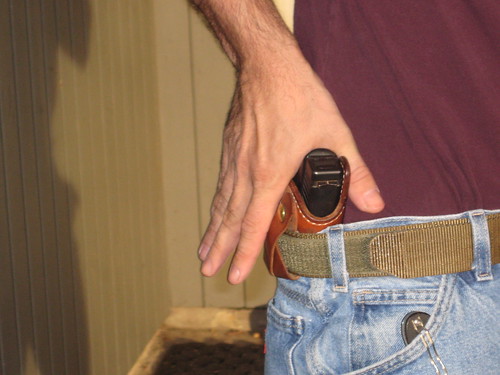
Next, the fingertips of the gun hand TOUCH the front strap of the pistol. This may seem insignificant. If you always open carry in duty gear or only carry outside the waistband with an open front concealment garment, you may never appreciate the need for this. However, if you truly carry concealed, particularly with an undershirt between your gun and a closed front cover garment, you'll probably recognize the import.

Image

If you allow the fingers to simply wrap around the butt of the gun, very often you will wind up with material between your hand and the gun. Obviously, this could present a problem during a reactive draw, when you can least afford it. If you always touch the front strap and slide your fingers into position, you mitigate this issue.

Image

While the primary hand is establishing the FFG on the holstered weapon, the other hand is staged flat against the chest no lower than the nipple line.

This position of the left hand [for a right handed shooter] supports a high collection point [e.g. where the two hand grasp of the firearm is established] which, in turn, supports getting the gun into the eye-target line as early in the horizontal line as practical.

Additionally, the off hand is in a position above the muzzle when the gun is at Count 2 and has more 'workspace' to become involved in physical manipulation and striking without covering oneself with the muzzle.

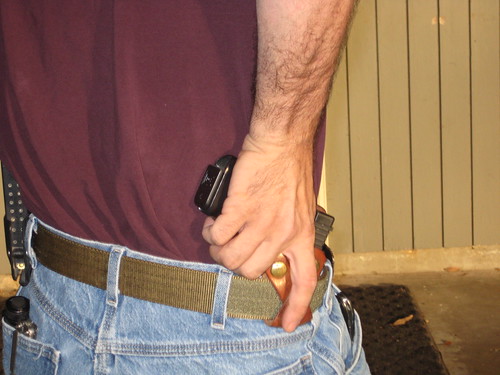
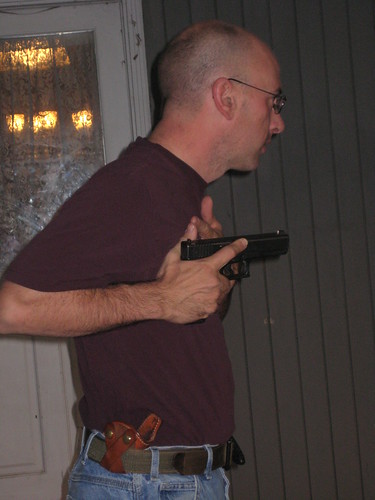
Following the establishment of the Full Firing Grip at Count One, we progress to Count Two. Count Two is the end of the vertical line of presentation and the beginning of the horizontal line of presentation. While we tend to drive the gun straight ahead of the torso, directly towards the paper target in front of us, one of the beauties of Count Two is that the gun may be driven straight to threat regardless of orientation to said threat. From Count Two, the weapon is driven straight to threat anywhere along the horizontal plane established by consistent 'stroke. If the threat is 30-degrees off-square, the gun is still driven straight to threat. If the threat is 95-degrees off-square, the gun is still driven straight to threat. If you are seated in the driver's seat of a vehicle and the threat presents at a hard left rear angle, the gun is still drawn to Count Two and driven straight to threat. Count Two is also a close quarters/retention firing position built into drawstroke. Notice the flagged thumb, locked wrist, high elbow and significant downward angle of the muzzle. The wrist and elbow are in the same orientation relative to the gun as they are at full extension. Familiarity with the downward angle and with the shotline thus established allows for much greater confidence when it comes to integrating unarmed skills and contact distance shooting into our skill sets.

Image

Image

An oft seen variation on count two of drawstroke has the shooter dropping the gun side elbow to bring the muzzle horizontal with the ground. The reasons exspoused tend to focus on getting 'better hits' on the target. This is pretty meaningless. The assumption that 'A zone' hits are going to shut someone down in the midst of a contact distance violent encounter and, somehow cause the problem to go away is ludicrous. You are in a fight for your life and your gun skill had damn well better support your ability to fight.

Image

Image

The gun is one piece of the overall situation. Bullets do not stop the aggressor's forward momentum. Bullets on the bad guy will not keep you on your feet. Gun pointed at bad guy will not keep you conscious when his big right hand crushes the bones around your left eye and his bulk drives you to the ground, crushing the air out of you .

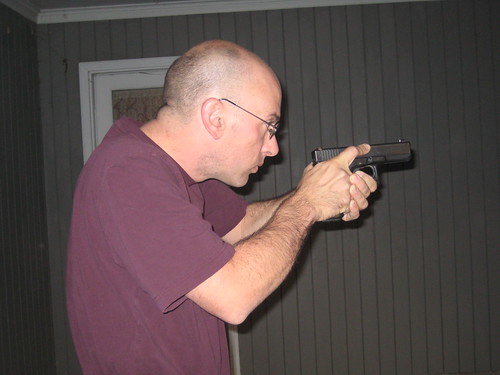
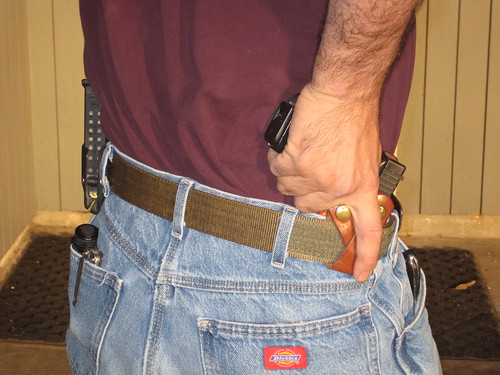
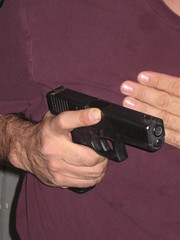
Moving from Count Two to Count Three is accomplished by driving the gun across the torso until it enters the peripheral vision. Notice the gun is further forward and higher than it was at count two.

Contact is maintained with the flagged thumb from count two until the gun reaches its' position under the dominant eye. The package moves forward until it enters the peripheral vision.

It's still Count Three even if we are firing one-handed. As a general rule, if we're going to put two hands on the gun, we do so at Count Three, but 'hands meeting' is not the defining attribute.

Image

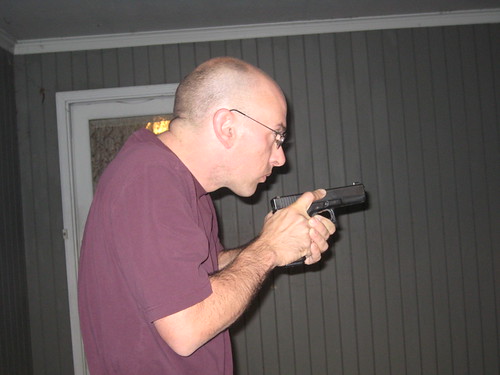
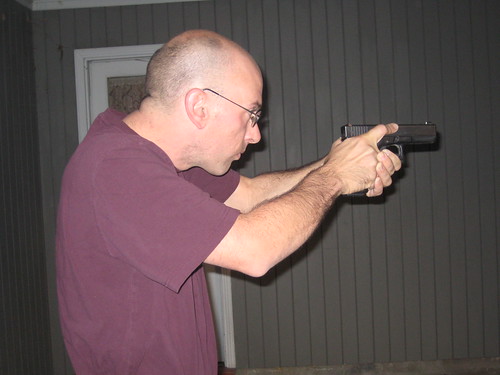
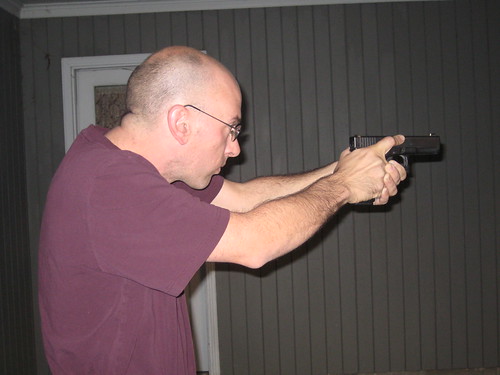
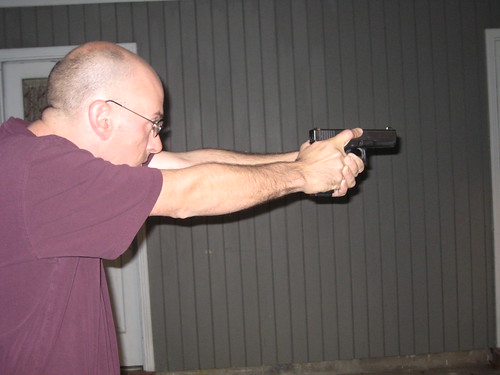
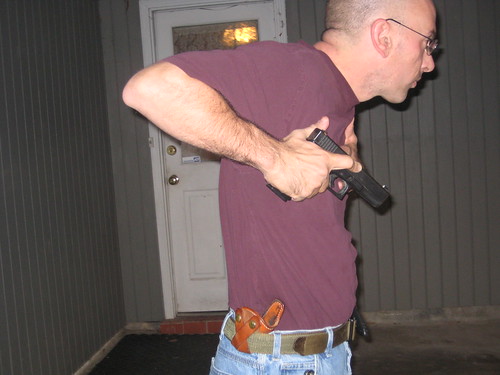
Count Four is a bit more conceptual than the others. Count Four is defined as 'Appropriate Extension or Compression'. While full extension [arms locked out, gun in eye-target line, focus on front sight, working trigger] is the most common form that Count Four takes, it is by no means the only one.Here's a series of pictures illustrating various degrees of extension within the horizontal line of presentation.

Image

Image

Image

Image
User avatar

tbrown
Senior Member
Posts in topic: 1
Posts: 1685
Joined: Thu Mar 17, 2011 4:47 pm

Re: The Combative Drawstroke

#2

Post by tbrown »

Hi Paul.

Thanks for posting the pictures. It seems like the difference between the 4-count and 5-count is in the middle. Both start with getting a full firing grip (grip) in the holster. Both end with bringing the pistol out and up to eye level in a two handed grip (up) if the target is at a distance where that's appropriate. Before that step, both bring the hands together (smack) if the target is not at bad breath distance. Before that, both have the pistol in a one handed firing grip close to or touching the torso.

The difference seems to be the 5-count rotates the muzzle forward and deactivates the safety (click) as soon as the pistol clears the holster (clear) with the pistol around mid ribcage. However, the 4-count has the upward movement continue after clearing the holster, until the hand is nearly in the armpit, with the muzzle rotating forward while the firing hand continues upward, giving a retention position that's a few inches higher on the ribcage, and maybe depressed somewhat from the horizontal.

From there, both draw strokes have similar motions. The hands come together while the pistol is close to the body, and then the extension continues so the handgun comes up to eye level with the muzzle horizontal and sights on target if time and space and tactics allow.

Based on body mechanics, it seems like the 4-count is a more natural movement. More gross-motor. Does it lose anything significant in speed?
sent to you from my safe space in the hill country
User avatar

Texas Dan Mosby
Senior Member
Posts in topic: 1
Posts: 730
Joined: Sun Jun 20, 2010 3:54 pm

Re: The Combative Drawstroke

#3

Post by Texas Dan Mosby »

Based on body mechanics, it seems like the 4-count is a more natural movement. More gross-motor. Does it lose anything significant in speed?
Yes and no....

No, because, IMO, this approach will give the typical shooter a more accurate initial index, which means they will spend less time cleaning up a sight picture before breaking off a shot.

Yes, because the shortest distance between two points is a straight line.

Let's check out Jules here:

Image


When you assign points to the holster (A), shoulder (B), and the gun at full extension (C), the shortest distance will always be from A to C, and physics tells us that that should mean it is faster, right?

Sometimes.

For most shooters, me included, it is easier to navigate from A to C using B as an anchor point. I find it easier to start dressing up the sight picture at point B during extension because I can more easily track the movement with my eyes, so when I get to point C, the sight picture is "closer" to what it needs to be to make the shot. I just don't have the hand-eye coordination to go from A to C without having to make refinements to the sight picture, which adds time to the shot. Some people DO though, and the extra distance traveled would simply slow them down.

So while the distance traveled is further, and it takes longer to get to extension, I find that I don't actually lose time because I make up for it by having a cleaner sight picture at extension. Given the simple mechanics of the draw, I am of the opinion that this would apply to most shooters, as the draw stroke is easier to be consistent with over time.

Does that make sense?

Test it at the range with a timer, and do what you think is best.
88 day wait for the state to approve my constitutional right to bear arms...
User avatar

TLE2
Senior Member
Posts in topic: 1
Posts: 755
Joined: Wed Feb 04, 2009 10:45 pm
Location: Houston Texas Area

Re: The Combative Drawstroke

#4

Post by TLE2 »

I've seen both and I guess it would depend on if you're drawing at the last second once a deadly threat is determined.

The 4 step draw "pauses" at the chest in a sort of "low ready" position, which takes a bit of time.

However, the "straight line" draw has the disadvantage of "casting" the weapon, with perhaps a bit of lost control.

At least that's how I see the differences. I generally use a draw, rotate weapon toward the target and then extend.
Laws that forbid the carrying of arms...disarm only those who are neither inclined nor determined to commit crimes... (Jefferson quoting Beccaria)

... tyrants accomplish their purposes ...by disarming the people, and making it an offense to keep arms. - Supreme Court Justice Joseph Story, 1840

speedsix
Senior Member
Posts in topic: 1
Posts: 5608
Joined: Tue Jan 18, 2011 8:39 am

Re: The Combative Drawstroke

#5

Post by speedsix »

...Bill Jordan didn't wait till the gun was fully extended before firing...he was an expert point shooter who "threw" his shots into the target...and amazingly fast on the draw...I am probably one of the slowest-reacting folks here and I always counted on being ahead of the other guy...thank God I always was...I would positively be laughable at competition shooting...

jdn181
Junior Member
Posts in topic: 1
Posts: 3
Joined: Sun Jul 10, 2011 9:02 pm

Re: The Combative Drawstroke

#6

Post by jdn181 »

This is the same drawstroke I teach in my classes.

Like mentioned above, physics alone, the shortest distance from one point to another is a straight line. And this might work just fine if you're only throwing the gun out to full extension and only firing there. BUT, the key to shooting fast is getting the sights on target as quick as you can - afterall, you can't pull the trigger until your eyes can verify that barrel of the gun is pointing at your intended target. Therefore the quickest way to acquire a sight picture is to bring the gun straight up, rock with elbow and shoulder, and then extend out.

As soon as you rock the top of the slide should be in your lower peripheral vision of your dominant eye. For short distances (1yd or less) that's an aimed position and if your physical indices are good you should feel confident firing from this position (abeit your barrel might be aimed a little downwards).

After you've rocked the gun your support hand comes over and completes the "master grip" on the gun - again an aimed position.

Once the master grip is complete you can start pushing the gun out while bringing the gun's sights into your sightline. The important thing here is you don't want any excessive movements. Any extraneous motion has to be stopped before the sights are properly aligned - which takes extra time. Ideally once you pull the gun from the holster the only body parts that should be moving are your upper arm (rotating at the shoulder), and lower arm (rotating at the elbow). Keep the wrist relatively rigid so you're not moving your wrist and as your gun goes to extension you'll notice that your front sight will follow your sight line and the rear sights will just rotate up into position.

If a closer-range shot is needed (meaning breaking a shot somewhere between rocking the gun at the shoulder and full extension) then you can go ahead and a bend at the wrist. By inducing a third degree of movement (shoulder, elbow, wrist) you'l sacrifice a little bit of accuracy and stability, but gain speed. Besides, if the target is close enough that you need to break a shot before full extension then you don't need to be extremely acurate anyway. I've trained for a number of years like this and this is my level of comfort: 1yd or less - shoot after rocking just as the mizzle clears the horizontal, 2 to 5yds - shoot at 50% extension, 5 to 7yds - shoot at 75% extension, >7yds - shoot at full extension.

If you're going to use your gun defensively then don't train to always break the shot at full extension as you will do this in real life regardless of the aggressor's range. Going to full extension on a target that's 3yds and closing fast is a really bad idea and there's a good chance they're going to grapple with your gun hand. As the target closes in you want to draw the gun closer to your body and shoot from a more compressed position. You'll sacrifice accuracy, but gain speed. Defensive gun handling is all about balancing accuracy and speed to produce the shot needed on demand. IE: Taking a 25yd headshot on an active shooter may require maximizing accuracy (thumbing hammer back on a DA/SA pistol, deep breaths, perfect grip, stance, sight alignment etc) vs. taking a shot on a knife-wielding target 7yds out and going full-sprint towards you.

Here are some benchmarks I try to shoot for (no pun intended):
(Full concealed carry @ 5o'clock in a minotaur holster, closed front shirt - 8" circle accuracy standard)
Break shot after rocking gun horizontal: 0.8 to 1sec (1yd target)
Break Shot at full extension: 1.5 to 1.8sec (3yd target)

TEX
Senior Member
Posts in topic: 1
Posts: 306
Joined: Fri Dec 24, 2004 6:02 pm
Location: Texas

Re: The Combative Drawstroke

#7

Post by TEX »

FWIW
I have tried a number of different ways and it seems to me that there are two different types of draws - street/tactical and competition, but time wise I cannot clock a significant difference between the two and think that unless you are at the level where can making a living shooting competitively, you are better off sticking with a street/tactical draw or something leaning heavily in that direction.

I seem to have settled into a hybrid of sorts leaning towards street/tactical. The main thing is the foundation which is the grip – thumb as far down and a very small pause here can pay off big (Step 1). From there I think the important thing is to get the muzzle level and pointed at the threat or target area, which I do by purposely trying to level the muzzle while it is still in the holster and while I am pulling it up and out of the holster with also some forward pressure towards the target (Step 2). By doing this a couple of things happen very quickly; the muzzle, as soon as it clears the top of the holster, pops to level and goes perhaps 8 inches in front and maybe 8 inches above the holster all at the same time - this is where my support hand seems to naturally want to meet the gun (Step 3). At this point the muzzle is level, both hands are on it, and it is one third the way to my extended line of sight. I now trace with my muzzle a dead strait line from where the muzzle is to where I want it – line of sight extened (Step 4). As long as I feather my stop when extended, the sight does cast down to target or roll up to target - like a Harrier jet rising and moving forward at the same time without changing the angle of the fuselage. The shortest distance between any two points is still a straight line. Once the muzzle is is level, I straight line it to my line of sight at extention. This works well for me in competition and I think it would serve me well on the street. As far as my support hand, I don’t stop anywhere or purposly place it on my bell. I just flatten it out and bring it across my body (flat palm facing chest and halfway between belly button and nipples), then it angles out to meet grip and rolls over when extended.

I know some insist you can make better semi-sighted shots (while extending) if the gun is already high up and level before extending. I have not found that to be the case for me. As always, your mileage may vary. The method I use seem to get the sight on target pretty quick and without bobbling.
The importance of getting the muzzle level from a street/tactical standpoint is that it allows you to engage the target earlier if it rushes you and you can take the slack out of the trigger while still being pointed at the threat, but before your sights are actually on the target. The presentation would be done a little differently if the threat was already close – draw straight up and rotate horizonal without pushing forward as early and angling body away from threat. For me, close is double arm length or tighter.
There will be no peace until they love their children more than they hate us - Golda Meir
Post Reply

Return to “General Texas CHL Discussion”