Page 8 of 11
Re: Show your DIY Ideas and Projects
Posted: Tue Jun 02, 2015 12:49 am
by ayoungoldguy
One hobby I’d like to get into is reloading, however living in the Dallas/Irving area in an apartment, I don’t have the spare space for a dedicated reloading bench.
I’ve been doing my cleaning and pistol and rifle mods on the dining room table (yes, I do make sure to adequately protect the table!) but there’s no way I could rig a reloading setup there because of the way the table is built. What I need is a portable bench setup, and even though I’ve scoured the internet for ideas, I haven’t come across anything that really looks like it’ll work. Does anyone out there have any pics, ideas or plans of DIY’s you’ve done? I sure could use some fresh ideas! Thanks!
Re: Show your DIY Ideas and Projects
Posted: Wed Jun 03, 2015 6:23 am
by Richbirdhunter
I'm a long time member at Ammosmith.com ( it's a reloading website) and I remember a thread about loading in small spaces.
Check it out.
Rich
Re: Show your DIY Ideas and Projects
Posted: Wed Jun 03, 2015 11:36 am
by puma guy
I started reloading shotgun shells as a teenager and only had the corner of an add on room to use. I made a sturdy 24"x24" stand out of 2X4's and 3/4 inch plywood for the top and a shelf. I used it for years with my Lyman Easy mounted on it. If you load metallic cartridges you'll probably need a larger area, but you' d be surprised how little space it would take. Mine was small enough to put in a closet though I never had to put it away. Good luck!
Re: Show your DIY Ideas and Projects
Posted: Wed Jun 03, 2015 12:28 pm
by mloamiller
Homemade snap caps, or dummy rounds.
I already reload, so these were easy:
- * I took a clean, de-primed case and set the bullet as usual.
* I put a little sand in the case (no powder, of course) to make it feel more like a "real" bullet.
* I filled the primer pocket with an eraser. I had to trim down the radius so it would fit in the pocket, used superglue to set it, then trimmed off the excess.
* I cleaned the case with denatured alchol, then "painted" it with a red sharpie.
My primary use will be to train on handling malfunctions - load one of these in a magazine so you get an unexpected "failure to fire" while shooting. I do a lot of shooting outside, so there is a risk I'll lose one of these while practicing, and I couldn't see spending $2-$3 each for one.
Re: Show your DIY Ideas and Projects
Posted: Wed Jun 03, 2015 12:35 pm
by mloamiller
ayoungoldguy wrote:One hobby I’d like to get into is reloading, however living in the Dallas/Irving area in an apartment, I don’t have the spare space for a dedicated reloading bench.
I’ve been doing my cleaning and pistol and rifle mods on the dining room table (yes, I do make sure to adequately protect the table!) but there’s no way I could rig a reloading setup there because of the way the table is built. What I need is a portable bench setup, and even though I’ve scoured the internet for ideas, I haven’t come across anything that really looks like it’ll work. Does anyone out there have any pics, ideas or plans of DIY’s you’ve done? I sure could use some fresh ideas! Thanks!
I have a workbench in my garage, but my reloading press is actually bolted to a wood platform which I clamp to the workbench with a three quick-clamps. I didn't want it permanently mounted to the bench because it would just be in the way of other uses. Using the clamps, it's easy to set it up when I need it and take it down when I'm finished. Perhaps your table, or a spot on a counter top has a place where this would work for you.
Re: Show your DIY Ideas and Projects
Posted: Thu Jun 11, 2015 8:34 am
by harv418
My Reloading machine is mounted to a piece of Butcher Block so that I can remove it from the Workbench. Stop by any Countertop dealer, and see if they have scrap pieces of Butcherblock Countertops. Most will have some thing they cut out for the Sink. A few dollars and you have a cheap, heavy mounting block which to use to make your Reloading machine moveable.
Re: Show your DIY Ideas and Projects
Posted: Wed Jun 17, 2015 12:33 am
by drjoker
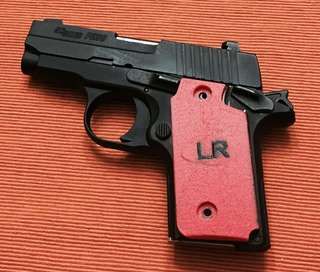
Made custom Sig P238 grips for a buddy of mine. I used a 3d printer and made it out of ABS plastic.
Re: Show your DIY Ideas and Projects
Posted: Fri Jul 10, 2015 8:59 am
by bmwrdr
drjoker wrote:Made custom Sig P238 grips for a buddy of mine. I used a 3d printer and made it out of ABS plastic.
Great! What 3D printer are you using?
Re: Show your DIY Ideas and Projects
Posted: Tue Dec 29, 2015 3:03 am
by drjoker
bmwrdr wrote:drjoker wrote:Made custom Sig P238 grips for a buddy of mine. I used a 3d printer and made it out of ABS plastic.
Great! What 3D printer are you using?
Makerbot Replicator 1st Gen. (the original wood one)
It needs constant maintenance. Don't buy Makerbot which is made in the USA. Normally, made in USA means quality, but not in this case. Oddly enough, buy the Wanhao Prusa I3 made in China. It is better. My brother has the Wanhao.
DIY Pistol Travel Case
Posted: Tue Feb 23, 2016 12:47 pm
by JohnS-TX
I had some airplane trips scheduled and wanted to take my S&W M-66 snubie along.
To transport the pistol I needed a sturdy hard-side pistol case. Looked at a variety of pistol cases in the Big Box stores and didn’t see anything that seemed to really suit the situation. Either they were plastic and seemed not all that sturdy, or were generic internally and had a lot of wasted space. Even though a lot of people fly their firearms inside plastic cases, the plastic cases just didn’t give me a warm, fuzzy, and secure feeling.
Made a pass through You Tube to see if someone else has created something similar (no need re-inventing the wheel). With minimal searching I ran across some Canadians that, by law, have to lock up their ammo. There were several videos adding a simple locking mechanism ( common bolt / nuts / washers) to a metal military ammo can.
I had an extra 30 cal metal military ammo can that seemed perfect for the project.
For the locking mechanism, in my junk box was an old car part ( thick metal bracket with a threaded stud). It took a little measuring and some cutting/grinding, but it worked great and was very secure.

For the padded interior, I visited a foam store to see what kind of material was available. They had a sheet of firm foam that was one inch thick.
The foam sheet provided enough material to make a custom insert for this pistol / small ammo carton. Plenty of foam left-over for inserts for other pistols that I may travel with in the future.
Used an exacto knife to cut out the outline for the pistol and ammo carton.
Used spray adhesive to glue the solid bottom layer to the middle layer (had the outline cuts). To attach the solid top layer to the bottom/middle layers I used a piece of very heavy cloth that also served as a hinge.
The finished insert fit inside the metal box with minimal clearance.

United Airlines does not require a soft-side suit-case, containing the firearm, to be locked; so I wanted to secure the metal box inside the soft-side suit-case.
Drilled a hole in the bottom corner of both sides of the box. Bought a short link of medium metal chain at Home Depot. Wrapped the chain around the interior struts of the suit-case. Then threaded the ends of the chain into the box. Used a medium sized key lock inside the box to secure the ends of the chain. Had to cut chunks out of the foam insert to make room for the lock/chain. Very secure.

United’s check-in procedure at both Houston and Memphis was totally un-eventful. No questions – no hassle. The Agents knew exactly what do with a “declared firearm”. I placed the signed/dated orange declaration card on top of the locked box. The Check-in Agents didn’t ask me to open things up to verify the pistol was unloaded. The TSA x-ray machine was very close to the Check-in Counter. It took TSA about 2 minutes to scan the suit-case and give me the thumbs-up.
I tried to keep the project description at a summary level. Hope this provides some useful food for thought.
Re: Show your DIY Ideas and Projects
Posted: Wed May 25, 2016 2:55 pm
by PatrickMas20
Re: Show your DIY Ideas and Projects
Posted: Thu May 26, 2016 6:26 am
by TangoX-ray
PatrickMas20 wrote: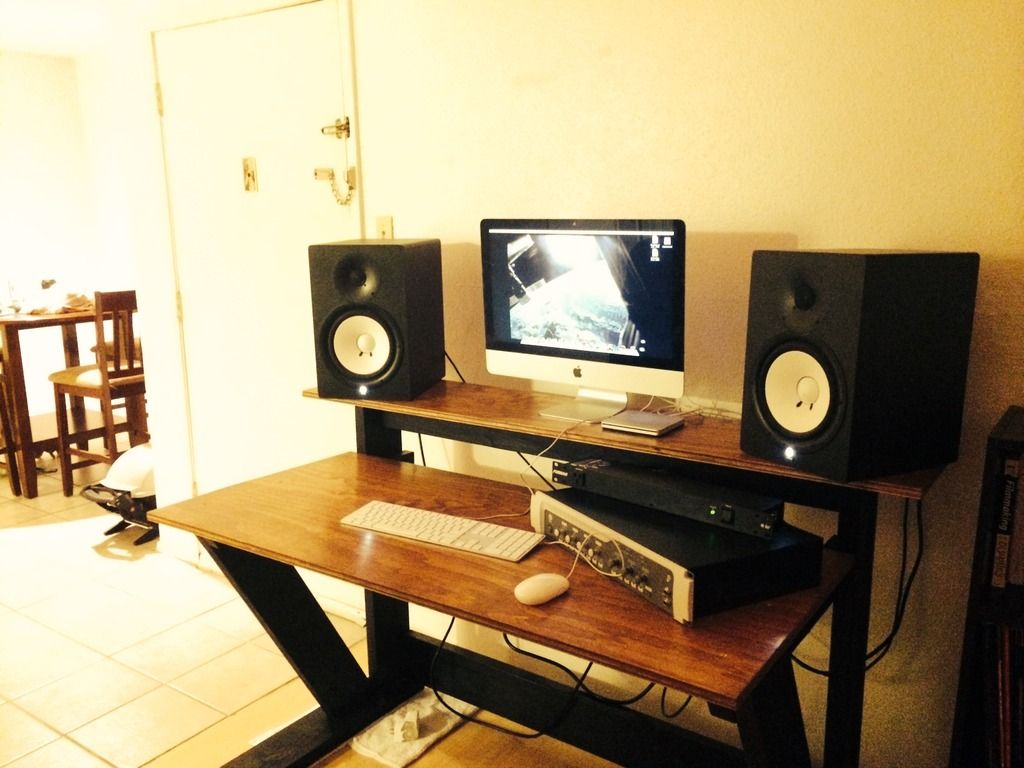
A couple little projects I did in my spare time....
Could you tell me a little more about this desk? Half inch ply and 2x8s? I've thought about building something similar.
Re: Show your DIY Ideas and Projects
Posted: Thu May 26, 2016 6:51 am
by PatrickMas20
TangoX-ray wrote:PatrickMas20 wrote:
A couple little projects I did in my spare time....
Could you tell me a little more about this desk? Half inch ply and 2x8s? I've thought about building something similar.
Some good quality ply, 2x6's (possibly 2x8's), and some 2x4s. If i can go back and re-do it, I would of used a Kregg Jig, and made pocket holes throughout the desk to hide the counter sunk screws on the desk and speaker tier.
I did not create these plans, I used a DIY blueprint and customized the height and length to the specific room I was putting it in.
Here's the link:
http://www.homestudioguy.com/PURCHASE_PDF_PLANS.html
Very detailed plans for $14.99
Re: Show your DIY Ideas and Projects
Posted: Thu May 26, 2016 10:36 am
by Scott B.
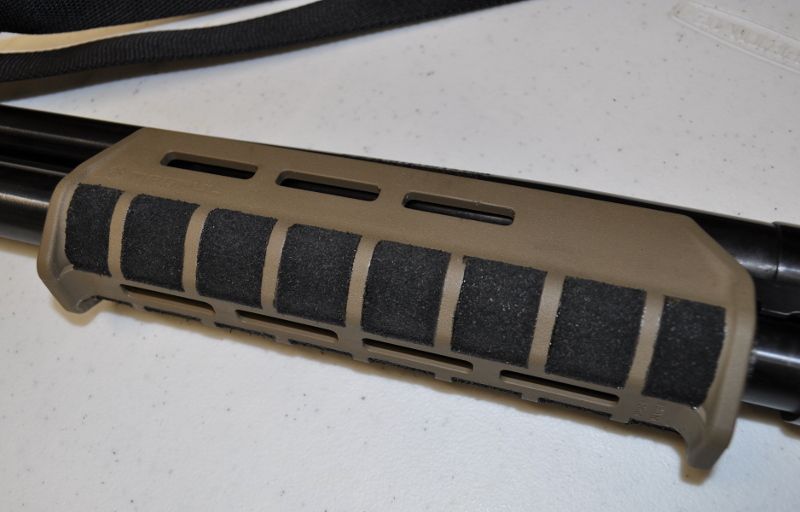
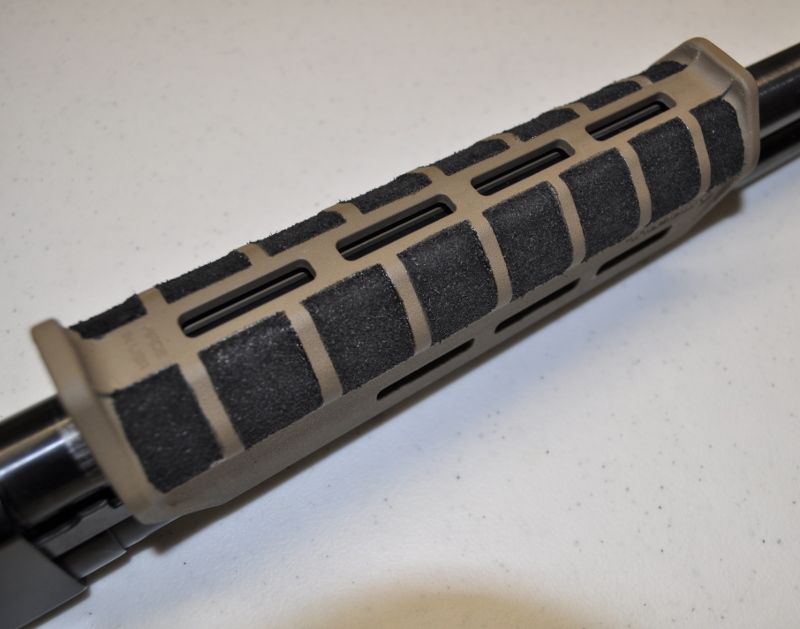
Project was adding texture to a Magpul shotgun hand guard (MAG494).
Did several test runs on AR grips I had laying around. Tried various 2-part epoxies. The texture material is powdered rubber. What finally worked was bedding compound.
This setup survived a Tactical Shotgun 2 class.
Long term is still an unknown.
Re: Show your DIY Ideas and Projects
Posted: Thu May 26, 2016 10:56 am
by Charles L. Cotton
I really like this thread and I've received a lot of PM's since it began from Members who find it to be a great resource.
Thanks to everyone who has contributed!
Chas.


